
I love a little bit of bling every now and then. Well, which girl doesn’t? But does it ever happen to you that no matter what you do your jewelry ends up getting tangled? This used to happen to me all. the. time! No matter how organized I tried to be, my jewelry used to end up in a hot pile of mess.
I even wanted to try out a tip that said that if you want to avoid your jewelry getting tangled, you can individually wrap it in plastic cling wrap and store it in your drawer or a jewelry box. But I don’t think I have the patience for that.
So, I wanted to get something functional like a hanging jewelry organizer which I could keep in my closet. You see, as much as I’d love to display my jewelry on the dresser, it always ends up getting messy after a few weeks. And honestly, I hate seeing all that clutter.
My initial thought was to buy something from Amazon like this organizer but then I thought, hey, why not DIY it? With a little inspiration from Pinterest, I decided to make something with things that I already have.
And mind you, I’m not so good at DIY projects that involve drilling and hammering. This DIY project requires just a foam board, a few nails or screws and a can of spray paint.
I had a spare piece of foam board that I had got for some art project (which never happened, btw) I also had a can of Gold Metallic Spray paint that I had used while doing this art project.
The only thing I needed were a few nails or screws that I found in our tool box. So basically, I already had all the things with me!
This project also gave me a chance to purge and clean out my drawer. I took out everything that I had and only kept those pieces that I really like. I got rid of all the rest of the jewelry which was either broken (but I was holding on to them) or the ones that were discolored or were not my style anymore.
Tip: I had read that an easy way to declutter is by following the 6-month rule. If you don’t use a piece of clothing or jewelry from your closet for 6 months straight, you are better off donating it or getting rid of it. (Of course, this does not apply to seasonal items like jackets, coats or summer essentials.) But it’s a good way of giving you an idea of what you really need and what you can choose to give away.
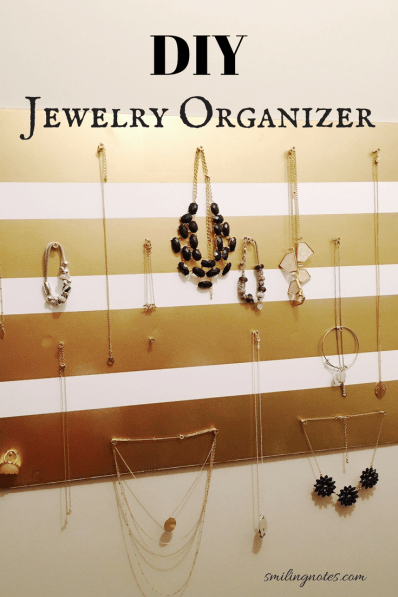
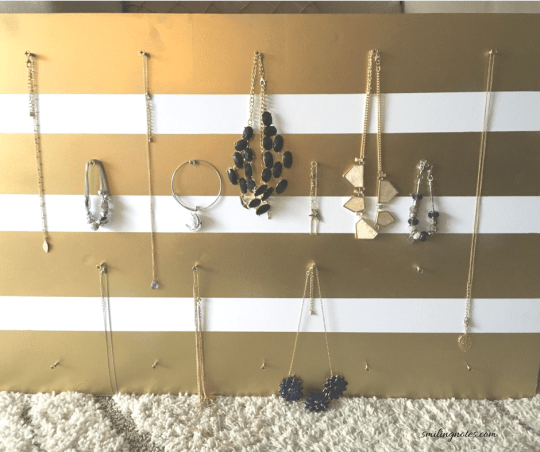
For this Jewelry Organizer, I went for a gold and white striped look but this is completely your choice. You can leave it plain white or you can completely cover it with any color of your choice.
Also, the fact that all my jewelry is right in front of my eyes makes it convenient to just grab a piece and go if I’m in a hurry.
So here’s how I made this super easy Jewelry Organizer –
Instructions:
- For a striped look, use painters tape to cover the areas that you don’t want your spray paint on. As with any spray paint, do it in a well-ventilated area. Remove the tape before the paint dries down completely. (I removed it after 10 minutes. The time may vary depending on the weather conditions)

- Next, spray paint the screws in gold in order for them to blend in.
- After the paint has dried completely, (I waited for about 2 hours) push your nails or screws inside the foam board leaving about 2 or 3-inch gap between them. You can easily push the screws with your hands using a little pressure.
- Once the screws/ nails are all set, use a Command strip to hang it on your wall.
Now this baby sits right in my closet! It’s been more than a month that I have been using this jewelry organizer and it has worked great for me! I’m so glad my necklaces don’t get tangled anymore.

Apart from my necklaces, I also use it to hang my bracelets. Of course, the more expensive pieces of jewelry are in their respective boxes but this has worked out great for the not-so-expensive and regular wear pieces.
Here are a few more ideas – You can even use a cork board instead of a foam board. If you are too lazy to paint, you can use washi tapes and stick them on the 4 borders or in any pattern of your choice.
Overall, this was a fun and easy DIY project which not only helped me to organize in a better way but also helped me to declutter.
And remember that organization isn’t always about perfection; it’s about simplicity and creating a functional system that you can use on an everyday basis.
Have you done any DIY projects lately? Do share it. I would love to know about it.
XOXO


Loretta
February 6, 2017What a great and inspiring post. I believe I have all the tools to declutter my jewelry box. It’s tres annoying to be able to sift through all of the tangled mess each time, so I will definitely be doing this with a black foam board that I currently have. Thanks so much for all the tips. Love the jewelry by the way 🙂
smilingnotes
February 6, 2017I’m so happy to know that you are inspired to make your own jewelry organizer, Loretta! And you are right, it gets really annoying and frustrating to sift through all the tangled mess. This has made my life a lot easier ?Thanks a lot!
Lifestylebites3
February 12, 2017Very creative and a good use of the board
smilingnotes
February 12, 2017Thanks Sangeetha!! ??
Pingback: Family Joy Blog Link-Up Party #55 - Ava's Alphabet
Pingback: Family Joy Blog Linky Party #55 | Love Inspired Details
Pingback: Family Joy Blog Linkup #55 - Pursue Your Project
Pingback: Family Joy Blog Link Party #55 - Keys To Inspiration
Pingback: Family Joy Blog Link Up Party #55
Pingback: Family Joy Blog Link Party #55 - MelClaire
Stephanie
May 14, 2017I wouldn’t have thought of foam board. Clever idea. Thanks for sharing at To Grandma’s House We Go.
smilingnotes
May 15, 2017Glad you liked the idea, Stephanie. Thank you so much.